

I was truly inspired by all the subway art that seems so
popular right now and couldn’t wait to have such a bold graphic piece on
display in our home. I would’ve bought one but after lOts of looking
and not finding one with a phrase
I liked Peter suggested I make it myself...hehe soo I did! With his help of
course ;) I was set on making it “pallet style” with a little extra detail to
give it interest, and created my own stencils. I keep
mine up year round, but if you use this saying it’d be a very sweet sentiment
to have on display for Valentine’s Day!!


Here's what you’ll need:
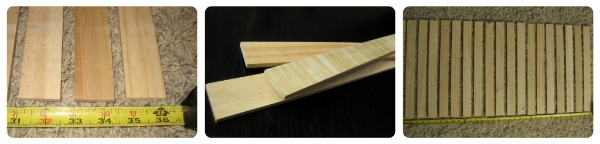
* 3’x2’, ½” plywood - cut to desired dimensions (mine finished
being 17.5”x32.5”)
* 20 5-gallon paint sticks – cut to desired width (I just had Peter cut the nubby end off and determined the overall width of my board that way)
this was thee mOst fun part!!! going
around to Home Depot and Lowes asking for the “big” paint sticks and seeing how
many they’d actually give me…hehe
* Grey acrylic paint
* Cream (or white) acrylic paint
* Paint brush
* Paint brush
* X-acto knife
* Stencils
* Wood glue
* Wood glue
How
to Create Custom Stencils:
I started out by using Photoshop CS3 to create
my custom stencils. Open a New file with the dimensions set to the size of your
Subway Art, this allows your type to be to scale with your board.
Set “guides” a half inch from the top and bottom
and drop down rulers creating a template for spacing out the text an inch apart
as you go.
Select the “Type” tool and Arial Black font and
begin by typing the first line “THERE IS”. You will see it extends beyond the
canvas, to correct this and use the “command + T” or Transform function under
Edit to adjust the font to fit. Keeping in mind this is to scale with the size of our project, the text should end up being fairly large. My final font size ended up being "461.68 pt" but it may vary depending on the look you want to achieve and the degree of adjusting you do to the type.
Drop down a ruler guide just beneath this line
of text and another an inch below that (this will be the guide for the top of
our next line of text)
Continue with another text layer and type “ONLY
ONE” and adjust the size as before.
For the next line I wanted to make “HAPPINESS”
stand out so I used font Arial Narrow, once you type that continue with the
last three lines using Arial Black again.

(if you're wondering what my background is its a calender for my desktop a free download from Leelou-blogs.com - I inserted some of my favorite pics too..soOo cute!!)
When you’re ready to print make sure to uncheck
“center image” and align the text at the top edge. You’ll be printing in
segments, I did my best to fit two lines of text on each page.

Then just use an x-acto knife to carefully cut out each word. (I laid them out after printing and lined each word up with the correct spacing to ensure it would fit properly on the board)
The last part of the project is painting!! I just used leftover acrylic and mixed the shade of grey I
wanted to paint my board (after sanding it) but you can use anything you like, or spray paint if
its easier. I chose acrylic though since Peter and I had extra in our art
supplies (freeee!!!) and it would dry quickly after brushing it on. Once you have a dry, even coat, continue to paint the paint sticks as well.
When you’re ready to stencil place
all of your sticks TOGETHER (no spaces) on your board and tape around the
edges to keep them in place…and go to town :) hehe After its dried, space the sticks out approximately 1/8" apart and glue them in place using wood glue. Lastly, find the perfect spot to show off your new work of art!! I have mine in the hallway between our living room and dining room and always glance at the inspiring quote whenever passing through :)
It took me all night but
then end product was dEfinitely worth it…I am soo happy with how it turned out
and hope all of you are too!! If you have any further questions just comment
below!
This post was linked to:
This post was linked to:

No comments:
Post a Comment